And we're done! Hoorah!
I intend to quilt this immediately, but SS makes the point that it could be put away without fear of rusting. I see how that might be useful, but believe me, I'm not going to go to the trouble of making the quilt sandwich and basting it if I'm not going to quilt it asap!
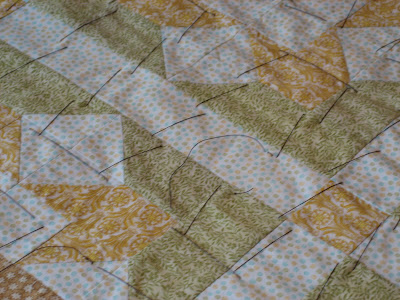
Close up of the basting. The loose tail is the trailing end of a length of thread. You'll find that the traditional 18" gets used up almost immediately, so I quickly got into the habit of using long lengths of thread at a time. (Let's call it a yard at a time, and not say anything to the stitching police about how far over the length limit I was, okay?)
In order to end a length, just take a second stitch right where the first was, and leave the tail. Knot a new length and you're off & stitching again.
This is the back. I appear to have gotten the stripes pretty evenly spaced, so I think it will look okay when the binding's in place.
Incidentally, if you do fold it up and put it away, make sure the backing is showing. The backing has the small stitches, where the top has the carrying threads from stitch to stitch. Those carrying threads can catch on stuff, so it's a lot safer and tidier if those long carries are on the inside, out of harm's way.
Incidentally, that back looks good, wouldn't you say? I hope Emily likes it -- her parents specified yellow and earth tones, which I think this stripe exemplifies.
Here's the backing, close up. See how nice those stitches look? And the one diagonal stitch was done on purpose to show where the center on the top was. I got it pretty much spot on, I'm hoping!
And that's the end of my pictorial essay on Sharon Schamber's pinless basting. Pluses include being able to do it inside, sitting down, and not on a surface larger than your quilt top! Minuses include the insecurity that comes from doing something for the first time ever.
Would I do it again? Certainly for the next quilt I'm doing, which will also be small (crib size, basically) and thus manageable. But the next queen size quilt? I dunno. If I do, I'll tell you all about it when the time comes.
Monday, June 30, 2008
Sharon Schamber's Pinless Basting, Part 3
Here I've started the herringbone stitch SS calls for. Notice that the stitch is a short (half an inch, say) stitch from right to left. The long slashes are the carries from stitch to stitch.
On her video, Sharon makes the point that this is faster than pin basting. I think she may be right, although it's hard to say because I do pin basting in the loft of our horse barn (nope, no horses, just barn), which is not a place one would linger in, or leave a quilt top out for very long. As a result, on the two occasions when I have basted a quilt there, I have not lingered. You can see why here . . . Anyway, this process pictured here all took place in my nice, cool, mostly insect free dining room. As a result, I happily started the process on Saturday and then finished up Sunday morning. Aggregate times are probably less than pin basting, but it's hard to say.
Here, the stitching continues. You work from right to left (or left to right if that feels better) over an area roughly 14" from front to back. I suspect I was working on a slightly smaller area, but it doesn't really matter.
I used a basting needle (identified as a millinery needle with basting as the subtitle) and buttonhole thread. SS talks about using pearl cotton without specifying what size. When I next unearth my stash of crochet cotton, I'll see if the smallest of those would work. Here, I wanted something with a fair amount of contrast to the yellows in the quilt top, so I used brown.
When you've finished the width of the sandwich, it's time to unroll some more backing, smooth down the batting, and unroll the top. Again, this all worked remarkably well. SS advises you to lightly starch the top and backing. I did, simply because I figured it couldn't hurt. I'm not convinced I had to do this, but it's probably a good idea.
This shows the sandwich in place, ready for the next side-to-side basting. Notice that the quilt top is completely unrolled, but that I've kept the 1x4 in place to add to the stability.
I did make one small mistake while I was at about this point. You will see in this photo, and the one below, that there are a few inches of already-basted sandwich still on the table before the unbasted area begins. Ah, if only I'd had the sense to leave that bit there. Unfortunately, I instinctively moved the already-basted bit down toward my lap, so that the unbasted bit was easier to get to. Well, that resulted in a tiny bit of distortion on one side -- a slight puckering on the quilt top near one edge. I'm not too worried; I figure I'll just snip a few more of the basting threads before I get to quilting that bit, and that will allow me to spread the bubble around.
What you can't tell in this photo is that the backing is still rolled up on its 1x4 underneath the batting and top. The basting is almost half-way done. Keep stitching in the herringbone style until it's all done!
Final photos in Part 4.
Sunday, June 29, 2008
Sharon Schamber Pinless Basting, Part 2
I've started to wrap the backing onto its 1x4. This doesn't have to be super snug, but it does have to be relatively straight. Notice that the top still isn't fully wrapped up. You get another opportunity to line the top and the backing, which I was relying on to ensure that the square nature of the pieced back didn't look stupid. Of course, I won't know for sure until I've sewn the binding on, but I did my best to keep it from being too katty-wampus!
Another view of top and back in mid-roll.
Here, bot the top and the backing have been fully rolled onto their boards.
At this point in her video, SS rotates the boards on the surface she's working on, so that she doesn't have to move to the other side of the table. In my case, I just walked around and started unwrapping from the left where I had rolled up from the right side of the table.
It's at this point that you introduce the batting to the process. First, unroll about 16" of the backing, leaving the rest on its 1x4. Next, drape the batting over the backing. Remember, this process is pretty much the same as the standard pin basting with one CRUCIAL difference: because the backing and top are rolled smoothly on heavy pieces of wood, they don't need to be stuck down on the table.
After the batting is smoothed (I actually pat it in place, figured that bubbles can be encouraged to lie flat more easily than they can be stretched out to either side), place the top where you want. Here's where I got somewhat fussing, lining up the center seam with the seam in my backing. In most instances, it would only be necessary to center the top from side to side, and allow a reasonable margin of backing along the edge of the table.
I've just folded back the quilt sandwich to show that the backing is really the right way around. That's the genius of laying them out properly first -- once they're rolled up, it would be hard to get the backing upside down, but it never hurts to double-check.
In SS's video, she suggests starting with a length of sandwich roughly equal to the length of your arm from wrist to elbow. That's another good thing about her teaching style: she uses common sense concepts like measuring with your body rather than getting hung up on precision at this stage. Trust me, she's got precision nailed elsewhere in her quilting!
Basting, the Sharon Schamber Way
Sharon Schamber, in case anyone doesn't already know, has won Best In Show at Paducah two of the last three years, in both cases by makes very dramatic and intricate quilts with all-around phenomenal workmanship. She has a website, and offers both free tutorial online videos, and pay-for-view videos on more specialized subjects. I don't subscribe -- I'm so far away from what she does that it's like it's on another planet -- but someone on another blog (sorry, don't remember who) mentioned the pinless basting, so I thought I would give it a try. You can watch the video here.
First, some back story. The quilt top is approximately 50" square. I pieced the back out of an asymmetrical stripe. I just had to try to make it form boxes, so I cut the four pieces on the diagonal and pieced it really carefully to reduce the distortion for the bias edges. Seems to have worked, although I didn't have nearly enough fabric to make it line up all the colors perfect. Hey, it's the back of the quilt, and the kid's going to spit up on it, so let's not get all matchy-matchy about this, okay?
The first step is to lay out the backing, wrong side up, just as you would do if you were doing the more usual pin basting. I worked on my dining room table (part of the appeal of this method was that it didn't involved going out to the barn and spraying all the wasps' nests before I got started). The blue tape is NOT holding the backing to the table -- they are registration marks showing me where the quilt top should go so that the middle of the back will actually be in the middle of the quilt top.
Next, quilt top goes down on top of the backing, right side up. Note that there is no batting yet. I also didn't work too hard on getting the top and back to line up at this point.
Another view of the top. There will be variations in the color of the photos I took. Some seemed to work better with the flash, and some with the north light coming from the window to the left.
The next stage is to put a piece of straight lumber down on the top and start to roll it up. I picked out two relatively cheap pieces of oak 1x4 trim at Lowe's. I think what Sharon suggests is pre-primed trim pieces that would be smaller. If I use this method for larger quilts, I'll have to get longer lumber, and then I might see if I can get the stuff she used. But the two pieces I used are quite heavy, which turns out to be useful.
I've wrapped the top onto its 1x4, leaving the backing still on the table. Next, I'll wrap the backing on its own 1x4. You'll see in the next picture that I don't need to do all the wrapping at once. Sharon makes the point in her video that the weight of the lumber holds everything very smooth and secure, which makes this method possible.
This shows the top rolled onto its 1x4, while the back is still on the table. I can't explain the ripples on the backing; they don't seem to have affected the process, so either I smoothed them out before I wrapped the backing onto its board, or something.
That ghostly draping in the background is the batting. I actually bought two bats at JoAnn's the other day -- one that was just barely too small, and a larger one for the next quilt I plan on doing. Good thing, or I wouldn't have been able to get started with this project . . . again!
Friday, June 27, 2008
I Met Emily Yesterday
The yellow Wip is for Emily, the 3-month-old daughter of my dentist. I met her yesterday -- she's a Gerber baby for sure! -- and that's inspired me to get that sucker done. First step was to buy the batting. Now, I'll go make the back, which is pieced.
Keep watching this space -- I'm going to try to do the Sharon Schamber basting method, and if it works, I'll post pix here.
Wednesday, June 25, 2008
Still Flimsy, Still a Wip
I had some thought of working really hard to get the yellow baby quilt done for tomorrow, when I will be seeing the proud dad (aka my dentist). But various things have conspired to prevent me from trying out Sharon Schamber's method for basting the quilt sandwich, not the least of which is that although I have scads of batting, none of it is more than two feet wide. You gotta laugh (it uses less tissue than crying). So, although I've been JoAnn's recently, I'm going to have to make another trip to get batting.
The other real issue is that I'm being dragged into being a lawyer more hours a week than I had wanted to. (My ideal number of lawyer hours, paid or unpaid, would be zero.) I retired from the full time practice of law in 2001; I've worked for solo practioners part time on a couple occasions since then, but when I moved full time to the Endless Mountains, I figured that would be it for me as a lawyer.
But, as Starman and I are relatively young, we didn't want to close out the possibility that we'd need some extra income, so I keep up my license and continuing legal education hours necessary to maintain my active status. When the local historical society got sued by the local D-list celebrity, I volunteered my time for free. That meant that when we were ready to start the trial before our county judge, he figured out that I was available for court appointments. There are only a couple dozen lawyers in the entire county, and they need people willing and able to represent folks in custody and other cases. (I wouldn't let them appoint me in criminal cases; I know nothing about criminal procedure and so it really would be malpractice.)
So far, I've represented the mother whose parental rights are being terminated in one case, a child in another case whose biological dad was a no-show when his parental rights were being terminated, and most recently I am filling as counsel for the local children & youth agency. It's a lot, I'll be honest. I'm sitting here waiting for opposing counsel to call me. I should be cleaning up my sewing room/office so that I can a) get on with the yellow baby quilt, and b) prepare for a discovery dispute hearing next Monday.
Instead, I'm blogging. Says something, doesn't it?
Thursday, June 19, 2008
Yellow Wip (Part 2)
Here it is, done . . . at least as a quilt top. I learned a new term this week: this is a flimsy, meaning the quilt top waiting to be married to the batting and backing. Sorry the colors are so poor -- I have to figure out a better place to take photographs, but it's hard as all the rooms in this house have a color bias.
As I mentioned before, I'm concerned that there's nothing linking the middle section, which is four large blocks in a polka dot print on white, a yellow-orange print, and a green tone-on-tone, with the borders, which are yellowish browns on either side of a soft yellow. I had thought I would put some simple applique flowers on the borders using the middle three fabrics, but as I've never done applique before, I'm a bit concerned about trying it out on an otherwise-unoffensivequilt top flimsy. After all, it's not the flimsy's fault that I didn't think out all the design implications in my choice of fabrics! In the end, I'll probably end up deciding by not deciding in time. I really do need to have this done by next Thursday, when I'm seeing my dentist.
As I mentioned before, I'm concerned that there's nothing linking the middle section, which is four large blocks in a polka dot print on white, a yellow-orange print, and a green tone-on-tone, with the borders, which are yellowish browns on either side of a soft yellow. I had thought I would put some simple applique flowers on the borders using the middle three fabrics, but as I've never done applique before, I'm a bit concerned about trying it out on an otherwise-unoffensive
Tuesday, June 17, 2008
Yellow Wip
This is the yellow baby quilt for my dentist's daughter, Emily. Emily was born in April, so I'm a teensy bit late with this. I next see my dentist next week, so I need to get going on the basting and quilting.
This isn't the completed top, though, and already I'm concerned that there's not quite enough continuity between the middle section -- the white print, bright yellow-orange print and green tone-on-tone -- and the yellow & tans on the outer borders. I'll keep going with it, and see what happens.
Thursday, June 12, 2008
Slow finish
I was supposed to finish the yellow baby quilt today, in order to take it to the quilt guild meeting. Not happening. I had a full 12-hour session of continuing legal education on Tuesday, which necessitated getting up at 5 a.m., driving a couple hours, sitting in a small room with a less-than-compelling instructor until the evening, then driving home in the rain. Two things kept this from being a nightmare: I brought some cross stitch (although not enough; I finished everything I had before the evening session even started!) and I like to drive.
But the whole thing left me feeling unenthusiastic about the quilt. The one thing that got me a little revved up was the possibility of using a Sharon Schamber basting technique. I've bought some red oak (very heavy) 1x4 lumber, basting needles, and button thread in case I can't find my stash of pearl cotton. I just haven't gotten the top finished, a rather necessary step in the process. I will finish it today so that I can take the top in to the quilt guild, but I'll have to demonstrate the basting method another time.
Incidentally, I'm not sure how I feel about the Sharon Schamber Network pay-for-content deal. There's lots of good stuff on the free site, but I wonder what she could have on pay-to-see-them videos that makes it work $20/month. The way I see it, if you're already good enough to have even a rational chance of winning at Paducah, you don't need Sharon Schamber's techniques to put you over the edge. But maybe someone is a paid member of the SSN and can speak to its value -- ?
Tuesday, June 3, 2008
First, Post
I like to quilt, and not all the readers of my narrow end blog like to quilt, so I thought I would start a quilt specific blog. Our house is called Harmony (following a family tradition of referring to houses by their street names, and no, I don't mean "Joey Nuts" or "Tiny" -- just the name of the street; I grew up in the Green Street house, followed by Union Street, etc.), so it made sense to get really literal. I have a quilt studio, and it's in Harmony. I do my basting in the barn loft, admittedly, but "Basting in the Barn" seemed a really dumb title.
Here are links to my previous quilty posts: The first two quilts I ever did; the next three quilts, my sixth, the title quilt (and better photos for the first two), an essay on why quilting is hard for me, basting the Harmony Triangle quilt, the Harmony Triangle quilt finished, and finally the last thing I made.
Of course, you're welcome to read the whole of my blog -- the wedding, the dog, the house, the lilacs, etc., etc., but keeping this quilt-oriented, I thought I would just make it easier for you to get to the ones that count.
I'm working on one of the two baby quilts I've promised myself I'd do, and the top is nearly done. I'll post photos when it's complete. I want to get that quilt finished by June 12, which is the next meeting of the Chenango Piecemakers, which is the guild I've joined. I don't feel like it's "my" guild yet; I still feel like a visitor, but I'll settle in soon enough.
Okay, that's got this thing started. Next up: photos!
Subscribe to:
Posts (Atom)